Showing posts with label bare metal. Show all posts

Wednesday, 17 November 2021

Reinforcement panel clean up

After lengthy consideration, I decided to make more work for myself by removing the petrol tank support rails. They seemed fairly solid on the top facing planes, but were wearing thin along the bottom edges (water moisture + gravity + decades of road use = crispy metal). It's always difficult to know how to proceed when things are in a grey area (ie: the condition is not too bad, but not too good either), but I think that ensuring things are made solid has to be the overriding factor. So, more spot welds were drilled out followed by careful separation of the parts:

One huge benefit to having this section split into component parts is that I could now fit the reinforcement panel into the blast cabinet, so that it could be properly cleaned up for assessment:

I identified a few areas of concern as I went along. One was a slight kink/dent on the front edge that was likely caused by the front end shunt the car had sustained in the past:

This was easily rectified with a hammer and dolly: 

After a numbingly long time blasting I had things back to bare steal on the front and back:


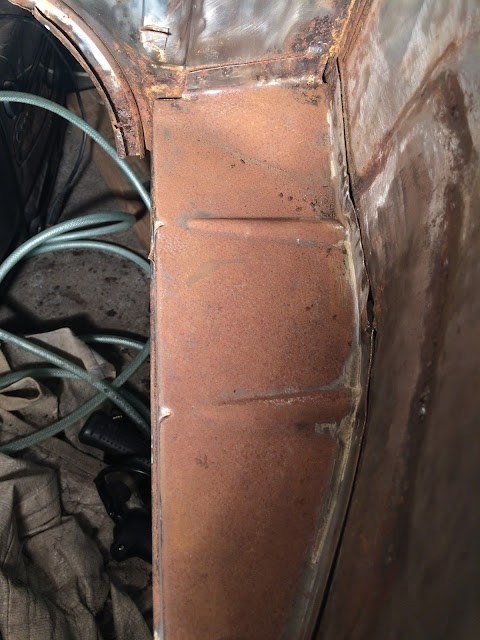
A potentially chronic issue may exist in behind some swelling visible along the overlapping seam of the washer bottle recess. See how it bulges outwards between the factory spot welds:

I fear that can mean only one thing ...bloated rust! That will likely need addressing... 

As for the tank support rails, I do have a couple of options; either replace with NOS ones (that come spot welded to the replacement quarter panels) or attempt to repair the originals. One of those options is obviously far easier, but that is not always how I choose to approach things. We shall see...

Wednesday, 21 July 2021

Scuttle and under-bonnet stripped and primed

Continuing on from last week's blasting endeavour, I spent many hours ensuring that all the hard-to-access nooks were spotlessly clean (NB: I left a couple of sections of original paint where it was in decent enough condition to remain in place for the time being):


Everything recieved several coats of Zinc galvanising spray for protection. It calms my mind to see less rust on the car!  

Wednesday, 14 July 2021

Blastin' the crud away

With the blasting drape making life considerably easier, I have been progressing with the clean-up under the scuttle and on the bonnet. I confess that the surface rust which had established so voraciously under the bonnet area and along the top of the scuttle was as a result of my own negligence. These are areas that I had previously taken back to bare metal and then not treated with any paint to prevent flash rusting. I don't know why, I just seem to make mindless mistakes occasionally (will I ever learn?!): 


I was making steady progress until I dropped my trusty old shot blaster and it snapped at a brittle weak point where the grit hopper attaches to the bottom of the gun. Damn it! Unfortunately It cracked off part of the casting that had an internal thread, which rendered it beyond repair:

I picked up a replacement gun that operates slightly differently:

It utilises a pick-up tube and syphon hose that can pull the blast media from a bucket. The main advantage being that I don't need to constantly stop to refill a hopper anymore. Assuming a big enough bucket of media is used, then the limiting factor is really just the duty cycle of the compressor:

As soon as I started using it I kinda wished that my old spot blaster had broken sooner as by comparison it was starkly apparent that it had become rather inefficient over time. In summary, I am happy with what has turned out to be an unplanned upgrade. The gun is far superior and faster to blast with:


Tuesday, 29 August 2017

DIY Powder Coating

What, no posts for two whole months ...what gives?! Well, I assure you that I have been progressing the car on several fronts, but I just keep coming up against panel alignment issues and other such demotivating frustrations, hence why I have not posted for a while. To reignite my enthusiasm I decided to focus my energy on something else for a change and thought it would be fun to turn my hand to power coating. I've always loved the way things looked in powder coat, but I didn't actually know anything about the process until doing it. I find that getting actively involved is often the best way to learn. 

To start with I spent an eternity methodically sandblasting and degreasing all of these miscellaneous components:


I then masked off certain areas using high temperature polyester tape and silicone plugs.

A word of caution: I ordered the masking plugs off of eBay whilst at work. I do not recommend searching for the particular key words 'silicone + plug' whilst visible to passing colleagues in an open plan office ...ohh, sh*t! Delete screen, DELETE SCREEN!

Using latex gloves to avoid contamination, I careful packed the parts into a paper lined shoebox and took them half a mile up the road to the workshop of my buddy Chris at 'Moody Moto'. He hand builds some incredible custom chopper motorbikes based around old Ducati engines and is one talented mofo (check out his sublime handiwork here). Anyway, he happens to have a basic powder coat setup and an repurposed domestic oven in his workshop for baking the parts. I bribed him with a pack of beers and set about it.

I hung the parts using conductive wire (thick welding wire in this case) from the removable oven shelf:


I opted for a black (RAL 9005) semi-gloss polyester coating manufactured by Interpon. I was concerned that full 'mirror' gloss might leave the parts looking a bit over-restored, so a more satin finish felt appropriate for my needs. The application of the powder was actually pretty simple. Once the electrode of the gun was attached to the metal shelf, the powder was liberally sprayed over the parts in a wafting motion. The electrostatic process attracts the powder particles to the charged parts leaving a layer of powder evenly distributed across the surfaces. I did it in 3 batches to avoid overcrowding and to ensure I could angle the gun sufficiently to coat all of the parts sufficiently:


Carefully the fragile dry coated parts were transferred to the preheated oven and were baked at 180 degrees for around 20 mins. Here is the magic result:


Look at that tasty serial number, so crisp:


A few more to feast your eyes on:


I am beyond pleased at the outcome as the cured finish exceeded my expectations. About 85% of the parts came out faultless and the remainder will need some minor touching up. Not bad for a first go! I have plenty of powder left and a few more parts that I think I will blast and coat in the near future; it would be rude not to!

Big thanks to Chris for allowing me to use his gear and guiding me through the process!

Tuesday, 22 November 2016

Salvaging an engine bay side tray

The time has come for me to start getting serious with the shell. I decided to set to work on the drivers (right) side rear of the car, just because I had the best assess to this section in its current orientation. First job was to get rid of the incorrect bumper hanger that had been welded straight over the original:


Presumably when the original bumper mount had rotted out to the point where it was ineffective this later model repair panel was just slapped over the top. I will never understand why garages never seem to cut out the old rusty area first; patching over the top just becomes a hot spot for further corrosion to form and spread with vigour! I guess it comes down to saving time and doing the minimum possible to keep the car on the road for the short-term. After all, the previous owners were most likely just using the car as a cheap daily driver with no concept that it will one day be regarded as a cherished classic and subsequently undergo a major restoration. I remind myself not to judge them too harshly for not future proofing and opting for low cost repairs. I now regard these typical slap-dash patches as the 'standard practice' which kept the car roadworthy in the past and thus saved it from the scrapyard. To me they are like old scars from a previous hardworking life and their ubiquity doesn't really vex me as much as it used to...

Anyway, I ground off the welds and peeled off the nasty panel:


Next task was to remove the engine side tray located on the inside edge of the above rear quarter:


Removal would obviously enable me to recondition this part easier, but also give me better access to eventually repair the bumper hanger section correctly.

It is worth mentioning that the side tray on the other (L/H) side is not worth saving as it is completely buckled from a rear end shunt (which the original owner explained was caused by a mini sliding on an icy road and crashing into the back of poor Gretch!). As you may have noticed from the previous post, I have got a Hooky replacement tray for that side, which is so accurate that it will be near impossible to know the difference once it is in situ.

I hit the outer area with the drill mounted wire brush to locate the position of the engine bay spot welds and marked them up with a permanent marker (kind of hard to see in the picture below, but they are marked in red):


Having centre punched each of the spots I used my dedicated spot cutting drill bit so that I did not damage the lip of the engine tray behind, which I was trying to keep intact.There were also a few spot welds that I drilled out at the bottom of the firewall from behind:


After switching to the Dremmel tool to cut a few little additional weld blobs that were holding it in place, I managed to remove the side tray without any drama:


Rusty R/H tray compared to the new Hooky L/H tray:


I cleaned off the flaky loose crud and then shot blast the entire thing:


Needs a few repairs and flanges straightening, but it seems solid enough to reuse:


Monday, 26 September 2016

Stripped and prepped

Spent an eternity stripping the temporary primer and grime off of the chassis in preparation for the top coat of Mastic 121. It is hard to stress in words just how time consuming this was - the big flatter areas obviously get stripped relatively fast, but that can be deceiving as it is all the nooks & crannies that become the vortex of time! Here is a breakdown of my pre-paint bare metal process:

  • stripped what I could easily get at with the drill-mounted wire brush and an angle-grinder mounted poly abrasive disc (< this was a true godsend!)
  • masked up the all the chassis orifices and shot blast the hard to reach areas 
  • keyed everything with 80 grit sandpaper to create a suitable roughened surface for the paint to bond to
  • Tack clothed the entire area to remove debris particles
  • Thoroughly panel wiped the chassis to clean and degrease
  • Applied FE-123 into any pitted areas of steel to neutralise any lurking residual rust
  • Once the FE-123 had hardened/blackened I sanded back those localised areas to remove excess
  • Blew entire area over with compressed air (including inside the chassis tunnel for good measure)
  • Final tack cloth & panel wipe all over until no trace of dirt was detectable on the rag

So here is the naked result of my boundless endeavour (NB: these were taken just before I applied the FE-123 because, despite being necessary, it made the chassis look less shiny and presentable);


The next post is going to be epic. The chassis will finally get a lick of sumptuous semi-gloss black (truth be told, I have already sprayed the first layer and it looks pretty damn sweet - but that is a story for another post)...

Monday, 25 April 2016

Quickie: Pan-werk

Finished dressing the plug welds around the inner edges of the pans:


Then turned my attention to the weld bead that should run along the outer front section of the pan/naps hat joint. In typically obsessive Rhysos style, I wanted to ensure that I got this weld as close to 'factory' correct as possible. So I dug out the end of the naps hat from the scrap metal pile and quickly shot blast the topside to reveal the original factory weld:


It proved to be a handy visual aid and my attempt didn't come out too bad:


Yet again, this area won't even be seen when the car is back together, but it is all good practice and nurtures sound working habits (or at least that's what I tell myself!). Did the same on the other side of the car, but it appears I forgot to take a photo. It is just a mirror image of the pic above though, so this blog post probably doesn't need it.

Admittedly progress has stalled slightly in the garage following a spell of tool malfunction and misfortunate over the past couple of weeks. My trusty angle grinder, rotary tool and drill (how many is that now?!) all packed up in quick succession. I am just in the process of procuring some suitable replacements...

Friday, 4 March 2016

Welding in the pan sections

I have been looking forward to this job for ages! This is the point where this abstract lump of metal starts to resemble a recognisable chassis again:


First task was to drill a couple of 10mm corresponding pedal bracket holes in the drivers side pan (the original holes appear to be 11mm, but I think the smaller hole looks neater). To get them in the right place I clamped the floor pan half into place and then sprayed a small amount of red primer through the tapped holes of the mount bracket. This gave me the markings I needed for my holes:


Next up I drilled out a series of holes spaced 25mm apart around the edges of the pans in preparation for plug welding. For the narrow areas (where the pan did closely follow the profile of the tunnel) I drilled 6mm holes and elsewhere I went with the standard 8mm:


Also added a few holes for plug welding the pan to the topside of the reinforcement plate, just as the original was attached: 


Then I cleaned up around the tunnel lip with the drill mounted wire brush and shot blast the small localised areas the drill could not reach. Once all traces of rust were eliminated I applied a liberal coat of zinc/weld-through primer.

On the passenger side pan I chiseled off the unneeded captive nut (which would have been used to mount the pedal adjuster on a later model LHD car) and then welded up the hole:


With the drivers side pan fitted up the best I could do, I began adding the plug welds. It was pretty slow going as I needed to scratch the primer out of each hole to be plugged with a scribing tool. Obviously the added benefit of taking time also ensures that heat doesn't build up to a point where things start to warp.

To ensure a tight fit I enlisted the help of a couple of friends (thanks Dangerman & Chimps) whenever I could grab either of them for an hour. They had the important task of standing on the inner lip edge of the pan ahead of where I was about to weld and would lean their weight on an inverted broom stick. This proved to be an effective way if getting a flush fit.

Drivers side pan in place:


Fortunately both of the pans pulled in tighter to the tunnel as I progressed, so the gap I was previously concerned about was less of an issue. In fact, it pulled so tight in places that I needed to rely on some hammer persuasion to keep things flat! 

Passenger side pan in:


Finally got it all mounted back on the rotisserie ready for clean-up and a few final touches: