Showing posts with label removal. Show all posts

Saturday, 26 November 2016

Rear valance removal

To start proper repair work on my bumper hangers I needed to detach the rear valance/apron. To begin with I removed the (incorrect) patch panel that had been welded over the top of the original (same old story as before!):


I then removed the buckled engine tray on the passenger side (L/H):


Removing the rear valance basically involves locating and drilling out all the factory spot welds. There are quite a few down the side lips. Most need drilling, but a few had already broken off, having weakened from corrosion:


A few more spot welds inside the engine bay on the upper protruding taps and down the inner flange: 


I then needed to grind a couple of small solid welds on the top edge of the lip:


Same procedure on the other side as you would expect:


And away it comes:


The valance hasn't faired well. The left hand side of the outer skin is misshapen from the rear end shunt (although this doesn't really show in the photos, but it is very obvious in real life). Additionally, the inner reinforcement section has a lot of corrosion and rust holes. It would take a lot of work to get this section anywhere near good again:


I will keep hold of it for reference, but ultimately replace it with a high quality BBT reproduction.

Tuesday, 22 November 2016

Salvaging an engine bay side tray

The time has come for me to start getting serious with the shell. I decided to set to work on the drivers (right) side rear of the car, just because I had the best assess to this section in its current orientation. First job was to get rid of the incorrect bumper hanger that had been welded straight over the original:


Presumably when the original bumper mount had rotted out to the point where it was ineffective this later model repair panel was just slapped over the top. I will never understand why garages never seem to cut out the old rusty area first; patching over the top just becomes a hot spot for further corrosion to form and spread with vigour! I guess it comes down to saving time and doing the minimum possible to keep the car on the road for the short-term. After all, the previous owners were most likely just using the car as a cheap daily driver with no concept that it will one day be regarded as a cherished classic and subsequently undergo a major restoration. I remind myself not to judge them too harshly for not future proofing and opting for low cost repairs. I now regard these typical slap-dash patches as the 'standard practice' which kept the car roadworthy in the past and thus saved it from the scrapyard. To me they are like old scars from a previous hardworking life and their ubiquity doesn't really vex me as much as it used to...

Anyway, I ground off the welds and peeled off the nasty panel:


Next task was to remove the engine side tray located on the inside edge of the above rear quarter:


Removal would obviously enable me to recondition this part easier, but also give me better access to eventually repair the bumper hanger section correctly.

It is worth mentioning that the side tray on the other (L/H) side is not worth saving as it is completely buckled from a rear end shunt (which the original owner explained was caused by a mini sliding on an icy road and crashing into the back of poor Gretch!). As you may have noticed from the previous post, I have got a Hooky replacement tray for that side, which is so accurate that it will be near impossible to know the difference once it is in situ.

I hit the outer area with the drill mounted wire brush to locate the position of the engine bay spot welds and marked them up with a permanent marker (kind of hard to see in the picture below, but they are marked in red):


Having centre punched each of the spots I used my dedicated spot cutting drill bit so that I did not damage the lip of the engine tray behind, which I was trying to keep intact.There were also a few spot welds that I drilled out at the bottom of the firewall from behind:


After switching to the Dremmel tool to cut a few little additional weld blobs that were holding it in place, I managed to remove the side tray without any drama:


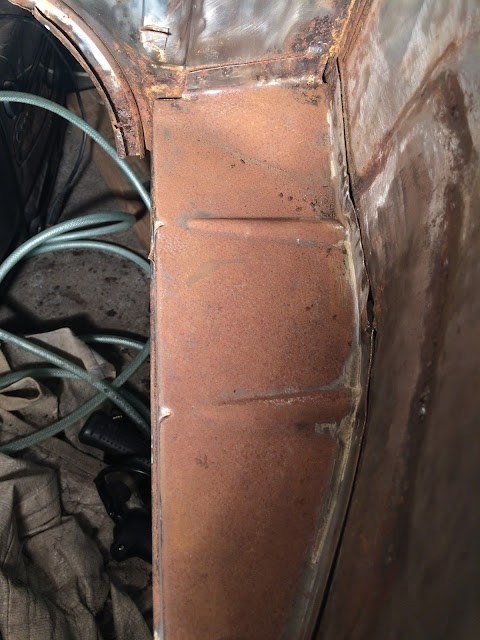
Rusty R/H tray compared to the new Hooky L/H tray:


I cleaned off the flaky loose crud and then shot blast the entire thing:


Needs a few repairs and flanges straightening, but it seems solid enough to reuse:


Monday, 2 February 2015

You were only supposed to blow the bloody doors off!

I have about half a dozen partially written blog posts sitting in draft form almost ready to publish, which pretty much mirrors the current state of the restoration; lots of partly finished things that I am slowly progressing without any big note-worthy leaps forward. Things are still cooking, but not in an easily definable way! There are a few factors that have slowed the pace down and these are my lame excuses in a nutshell:


  • No access to MIG welder - since my garage neighbour has moved out I have been on the hunt for a suitable (and affordable) replacement machine. Unfortunately the old beast I was using has relocated with him!
  • Too cold for paint - at the moment I cannot bare metal my components as the Mastic paint cannot properly cure in winter temperatures. Frustratingly I had a bunch of parts that I had already shot-blasted, but not put into paint and they have already started to rust again ....you live and learn!
  • Life outside the garage - the past few months have been a blur of other conflicting activities demanding my attention. 

So to ease myself back into regular and structured emails I have decided to be a bit more 'bitesized' with my offerings. Basically, shorter posts more frequently. To kick off the New Year here is a little overview on door removal:


First up I removed the pin and detached the bump-stop-hinge-arm (for lack of technical name):


This can then be withdrawn through the cavity between the door skins:  


To detach the door hinges an impact driver is obviously pretty handy. However, there were some bolts that just would not budge (something that I have become accustomed throughout this project!). For the tough ones resorted to my old friend LEVERAGE! I fitted the impact driver attachment onto my breaker bar and slowly applied pressure. This got the stubborn buggers moving without any trouble:


With the six screw bolts out the door can be lifted off:


I then withdrew the door glass and disassembled the winder mechanism, handle unit and quarter light:


Both doors are now ready to be stripped of paint (and probably hidden filler!), repaired and panel beat back into shape.

More updates to come. Soon. Promise!

Tuesday, 24 December 2013

What began a little distraction...

In between my welding practice I have been tending to a few rusty areas on the shell that have been distracting me from out of the corner of my eye. However, what began as a few minor areas has sort of snowballed (excuse the festive pun). Here is a quick run-down of the past couple of weeks of activity...


Crusty deck lid area:


The lip that holds the rubber seal was in pretty bad shape, so I decided to remove it and grind the area flat. I will most likely use the later type of engine seal - the one that fits directly onto the deck lid.


Drivers side rear quarter:


This was an area that had become really bad soon after I bought the car and I remember it failing its MOT one year because of the state of it. I had no choice but to take it to my local garage who advertised themselves as being specialist in vw restorations. Well, it turns out that what for years I assumed was just a 'skim' of filler to smooth out any imperfections turned out to be a dense layer that was hiding lazy repair work:


Once I had removed all the filler and turned my garage into a winter wonderland (the dust got everywhere despite using an extraction system) I could assess what had be done. Basically they had taken a flat section of sheet steel and made no effort to shape it to the contour of the car. They have then appear to have tack welded it into position and hastily ground the welds flat(ish) leaving unsightly abrasions all over the place. This was finished up by slapping copious amounts of filler (3-4mm thick in some places) over the top and sanding a fake profile. What a lazy bunch of cowboys!


I marked up the panel and cut out the abomination without delay. I found that the 'pros' hadn't even made an effort to treat the back of the repair patch and had just left it as bare metal, which had obviously rusted up nicely over the years. Oh well, the offending section is out now:


I then moved on to the inner arch area and figured I would strip it so that I could see what was going on beneath the underseal.


As expected there was quite a few old repairs and other repairs over the top (like patchwork in some places!) but there were vast areas of good condition original steel which was a welcome sight. I treated the whole area with a rust inhibitor before keying it up with the electric sander:


Then added a liberal coat of primer to keep the panel fresh until I get around to making the repairs. It funny - I hadn't intended to touch touch the shell until I had finished and rebuilt the chassis, but I must admit that it feels like a good to see some advancement whilst i'm mastering my welding technique! 

Monday, 30 September 2013

Dismantling the front beam

I decided to dismantle the front beam this past weekend in preparation for cleaning, painting and possibly narrowing: 


First up was the removal of the grease caps, which popped out easily enough with some gentle coxing of a flat-headed screwdriver: 


Once the nuts and washers had been taken off of the greasy spindle the outer casing of the drum brake came away without too much fuss: 


After undoing the three inner bolts the drum brake backing plate came free. Both sides came apart without any drama: 


I then removed both shocks, which were simply secured by bolts at the top and bottom:


Another two bolts later I had the steering damper detached:


The tie rods required a bit more persistence and preparation. I found that wire brushing the nut and exposed thread followed by a liberal drenching of WD40 (penetrating fluid) was the best method:


The above approach worked for all but one tie rod end (why is there always one little stubborn bugger?!). Frustratingly the thread started spinning freely before I had got the nut off. I found that no amount of clamping with the vice grips would hold the thread tightly enough to that damn nut to turn again. After some time and perseverance I decided that I would sacrifice the track rod end as I was considering replacing them all anyway. So, out came the angle grinder:


I then cleaned up the treads of the steering box and removed the unit with ease:


After loosening the clamping bolts I was able to tap out the link pins, which allowed for the removal of the spindles:


After removing the outer nuts and cleaning out the accumulated crap inside the allen key cavities, I loosed the threaded pin which holds the torsion leaves in place:


The torsion arms were then free to be removed:


Just for fun I set up an exploded view of the individual components that make up the front beam: