Although I had previously acquired a pair of genuine VW rear crossmembers I have since decided to take another route. Those Mexi ones could be made to work but have a different overall profile to the mid-sixties ones and are more square/angular looking. They also lack the mounting stud that locates the bottom hole of the rear wing as they are designed for later cars. One other annoyance is that they don't fit up to the Klassic Fab heater channels without trimming down the mating flange (located at the and of the channel) considerably. Those channels were expensive because they are high quality and accurate; I really don't fancy chopping them about!
Fortuitously a new reproduction crossmember has recently appeared on the market from out of nowhere and is supposedly 'German' quality (always a bit sceptical about that term) and made from factory gauge steel. I have seen them being used in a couple of other restorations, but have been unable to find out a lot of information about them. So, I contacted VW Heritage (one of the only UK stockists) to see if they had more about the manufacturer and swiftly received the following reply; "We don't have the manufacturers name, but we source them from a German supplier". Oh well, despite being no clearer about their origins I took the plunge and ordered a pair. I knew that they would still need modifying as they are made for cars up to '63, but in general they are a lot closer to mid-sixties OG ones and therefore a more logical basis to start from. I was quite impressed when they arrived, thick steel and super crisp pressings. Here is how they visually compare against the genuine Mexi (grey) ones, you can clearly see how much they differ:
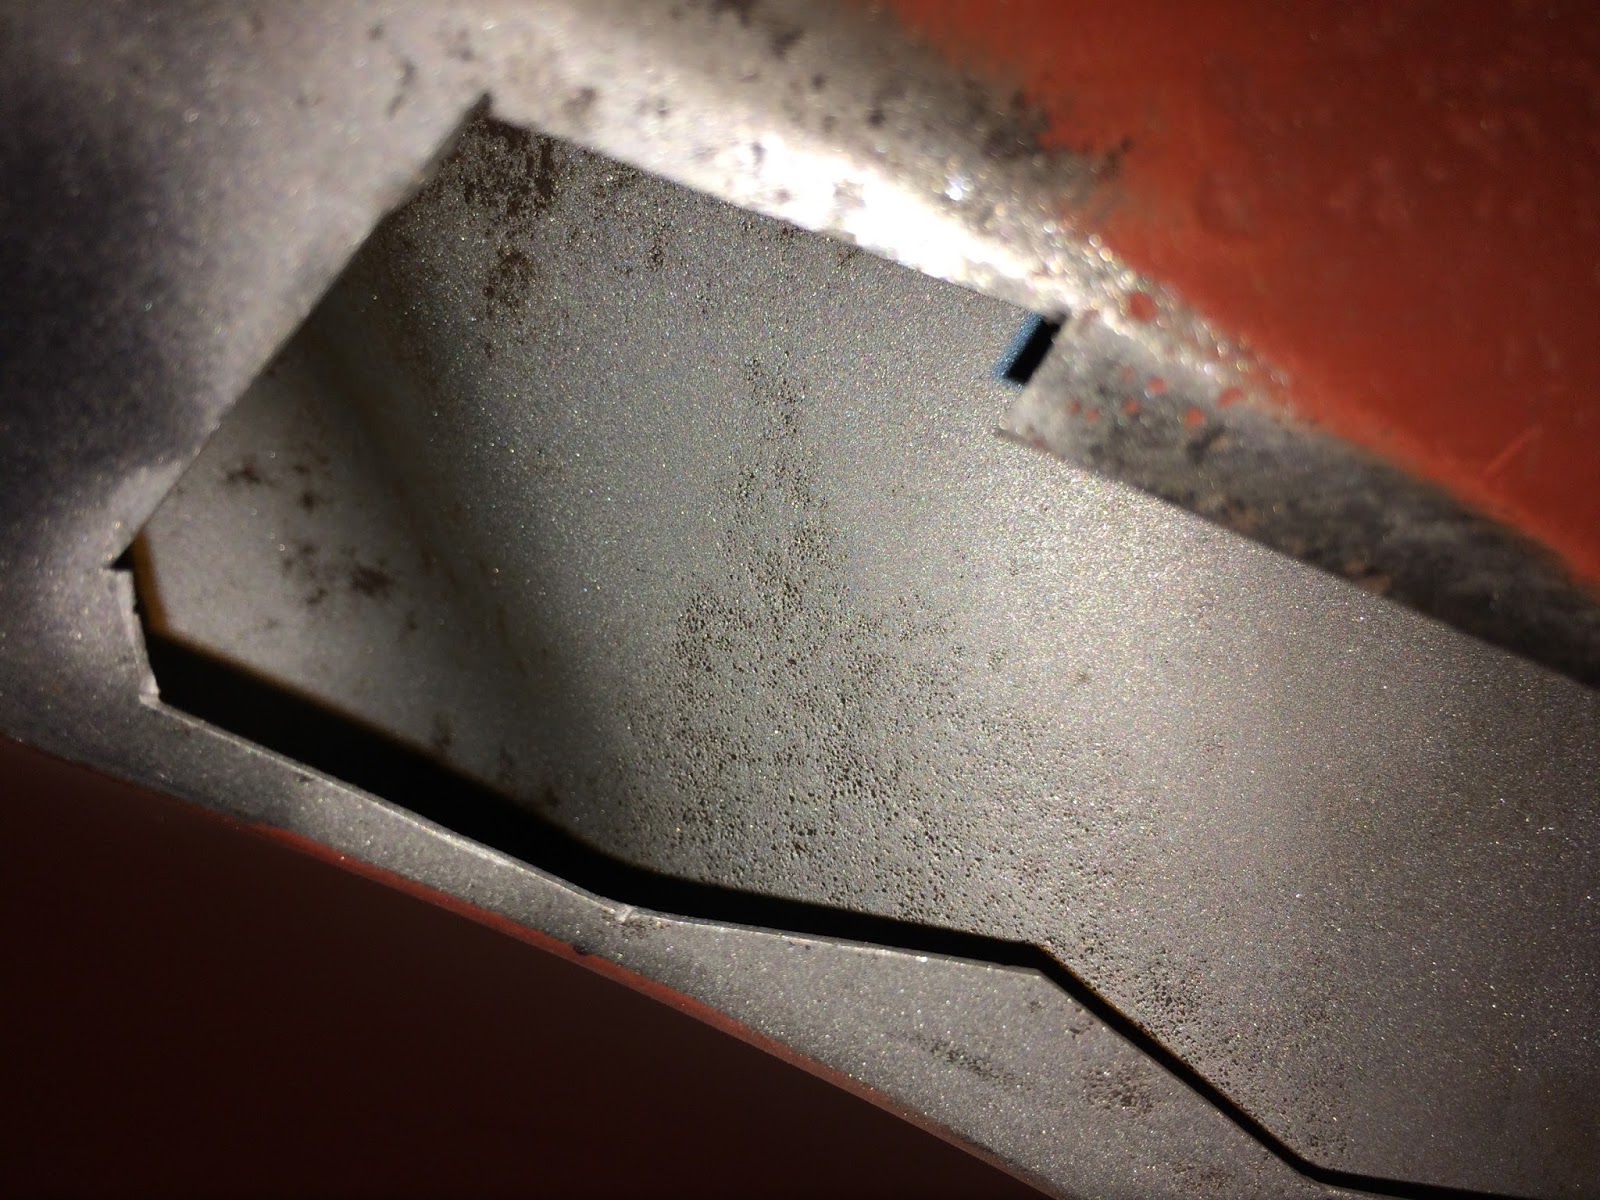
I salvaged a few things from my old crossmembers that will be transferred over to the new ones. Firstly, I needed to remove the heater pipe. I shot blast the area so that I could reveal where the factory welds were:
I then carefully worked my way around the pipe (on the front and backside) with the Dremel tool equipped with a small cutting disc until it came free:
Next task was to separate these little reinforcement pieces from the top of the bolt holes using the spot weld cutter:
After a quick clean up they are ready to be reused:
Utilising the remains of the old crossmembers as reference I am able to study what I need to do in order to make the new panels close to OG and devise a plan of action. In the next post I will go into detail about how to adapt the new cross members to make them correct for a '64 - '66 Beetle...
Friday, 8 September 2017
Tuesday, 29 August 2017
DIY Powder Coating
What, no posts for two whole months ...what gives?! Well, I assure you that I have been progressing the car on several fronts, but I just keep coming up against panel alignment issues and other such demotivating frustrations, hence why I have not posted for a while. To reignite my enthusiasm I decided to focus my energy on something else for a change and thought it would be fun to turn my hand to power coating. I've always loved the way things looked in powder coat, but I didn't actually know anything about the process until doing it. I find that getting actively involved is often the best way to learn.
To start with I spent an eternity methodically sandblasting and degreasing all of these miscellaneous components:
I then masked off certain areas using high temperature polyester tape and silicone plugs.
A word of caution: I ordered the masking plugs off of eBay whilst at work. I do not recommend searching for the particular key words 'silicone + plug' whilst visible to passing colleagues in an open plan office ...ohh, sh*t! Delete screen, DELETE SCREEN!
Using latex gloves to avoid contamination, I careful packed the parts into a paper lined shoebox and took them half a mile up the road to the workshop of my buddy Chris at 'Moody Moto'. He hand builds some incredible custom chopper motorbikes based around old Ducati engines and is one talented mofo (check out his sublime handiwork here). Anyway, he happens to have a basic powder coat setup and an repurposed domestic oven in his workshop for baking the parts. I bribed him with a pack of beers and set about it.
I hung the parts using conductive wire (thick welding wire in this case) from the removable oven shelf:
I opted for a black (RAL 9005) semi-gloss polyester coating manufactured by Interpon. I was concerned that full 'mirror' gloss might leave the parts looking a bit over-restored, so a more satin finish felt appropriate for my needs. The application of the powder was actually pretty simple. Once the electrode of the gun was attached to the metal shelf, the powder was liberally sprayed over the parts in a wafting motion. The electrostatic process attracts the powder particles to the charged parts leaving a layer of powder evenly distributed across the surfaces. I did it in 3 batches to avoid overcrowding and to ensure I could angle the gun sufficiently to coat all of the parts sufficiently:
Carefully the fragile dry coated parts were transferred to the preheated oven and were baked at 180 degrees for around 20 mins. Here is the magic result:
Look at that tasty serial number, so crisp:
I am beyond pleased at the outcome as the cured finish exceeded my expectations. About 85% of the parts came out faultless and the remainder will need some minor touching up. Not bad for a first go! I have plenty of powder left and a few more parts that I think I will blast and coat in the near future; it would be rude not to!
Big thanks to Chris for allowing me to use his gear and guiding me through the process!
To start with I spent an eternity methodically sandblasting and degreasing all of these miscellaneous components:
I then masked off certain areas using high temperature polyester tape and silicone plugs.
A word of caution: I ordered the masking plugs off of eBay whilst at work. I do not recommend searching for the particular key words 'silicone + plug' whilst visible to passing colleagues in an open plan office ...ohh, sh*t! Delete screen, DELETE SCREEN!
Using latex gloves to avoid contamination, I careful packed the parts into a paper lined shoebox and took them half a mile up the road to the workshop of my buddy Chris at 'Moody Moto'. He hand builds some incredible custom chopper motorbikes based around old Ducati engines and is one talented mofo (check out his sublime handiwork here). Anyway, he happens to have a basic powder coat setup and an repurposed domestic oven in his workshop for baking the parts. I bribed him with a pack of beers and set about it.
I hung the parts using conductive wire (thick welding wire in this case) from the removable oven shelf:
I opted for a black (RAL 9005) semi-gloss polyester coating manufactured by Interpon. I was concerned that full 'mirror' gloss might leave the parts looking a bit over-restored, so a more satin finish felt appropriate for my needs. The application of the powder was actually pretty simple. Once the electrode of the gun was attached to the metal shelf, the powder was liberally sprayed over the parts in a wafting motion. The electrostatic process attracts the powder particles to the charged parts leaving a layer of powder evenly distributed across the surfaces. I did it in 3 batches to avoid overcrowding and to ensure I could angle the gun sufficiently to coat all of the parts sufficiently:
Carefully the fragile dry coated parts were transferred to the preheated oven and were baked at 180 degrees for around 20 mins. Here is the magic result:
Look at that tasty serial number, so crisp:
A few more to feast your eyes on:
Big thanks to Chris for allowing me to use his gear and guiding me through the process!
Monday, 26 June 2017
Stud patch process
Remember a couple of posts back when I was patching the stud line and had made a replacement captive nut section but opted not to weld it in for some vague reason? I didn't admit it at the time, but the truth is that I made a complete mess of the rear of that patch panel whilst attempting to weld the captive nut into position. Originally I drilled the 4 corners of the weld nut and tried to plug weld through them. However, the intense heat actually melted away edges of the nut and left a less than desirable outcome. It looked like crap, so forgive me for not sharing a photo of that abomination! After some contemplation, I decided to remake that patch taking a different approach to affix the nut. Essentially, I would start out with an oversized off-cut of steel and plug weld the captive nut in place neatly before spending the time trimming it down to the exact shape required. Less time wasted if I happened to balls it up again...
I used a scribe to trace round the shape of the old piece (on the other side) and locate the position of the main nut hole (10mm). I then drilled out 4 smaller holes that I would plug weld through:
As you have probably gathered, for this method I welded from the front side into the captive nut, rather than from the back through the nut.
M8 captive nut (Hooky's) camped into position and perfectly aligned ready for plug welding through the four holes:
Welded and ground flush to a tidy finish:
Good penetration on the underside and most importantly, no edges burnt away:
Now that I was content with the outcome I took my time carefully shaping the patch:
Positioned on the wheel arch:
Welded, finished n' linished:
Moving on around the arch I deemed that the next captive nut was saveable as the steel still appeared thick and the surrounding area was not sunken or protruding. So, I welded up the slits (left over from my previous patch repairs) and smoothed everything back:
The next captive nut, complete with the partial remains of an old seized bolt, was completely shot and promptly chopped out :
This revealed quite a bit of surface rust behind it on the inner (soon to be inaccessible) panel. I shotblast the area the best I could to get it back to clean steel:
Then sprayed a couple of coats of zinc primer to keep it protected:
Whilst that was drying I knocked up another repair patch using the above approach. Fabricated this one in literally half the time now that I know what I am doing:
Couple of tacks to hold it in place:
After waving the magic wand:
This wing mounting area is becoming a lot more solid now. A lot of work has gone into it (with more to come!), but I think the results are worth it:
I used a scribe to trace round the shape of the old piece (on the other side) and locate the position of the main nut hole (10mm). I then drilled out 4 smaller holes that I would plug weld through:
As you have probably gathered, for this method I welded from the front side into the captive nut, rather than from the back through the nut.
M8 captive nut (Hooky's) camped into position and perfectly aligned ready for plug welding through the four holes:
Welded and ground flush to a tidy finish:
Now that I was content with the outcome I took my time carefully shaping the patch:
Positioned on the wheel arch:
The next captive nut, complete with the partial remains of an old seized bolt, was completely shot and promptly chopped out :
This revealed quite a bit of surface rust behind it on the inner (soon to be inaccessible) panel. I shotblast the area the best I could to get it back to clean steel:
Then sprayed a couple of coats of zinc primer to keep it protected:
Whilst that was drying I knocked up another repair patch using the above approach. Fabricated this one in literally half the time now that I know what I am doing:
Couple of tacks to hold it in place:
After waving the magic wand:
This wing mounting area is becoming a lot more solid now. A lot of work has gone into it (with more to come!), but I think the results are worth it:
Labels:
fabrication,
grinding,
Hookys,
MIG,
rear quarter,
repair,
welding
Sunday, 18 June 2017
10 years ago
Came across this old email communication recently from exactly 10 years ago (dated 18/06/2007). It is from a local classic car restoration company who I had previously contacted about getting some 'economic' repairs done to the heater channels and body mounts with a view to keep Gretchen on the road. No doubt that this concise reply was a huge contributing factor for me ultimately deciding that I had to tackle this resto myself or part ways with her. The reality was that keeping her running was no longer viable:
"thanks for the pics. sorry to say but i am not willing to do a simpleThe decision to fully restore the car myself was a tough and intimidating choice to make, especially being totally unskilled in the area of automotive restoration. I am really pleased I stuck with it (I think) and still have my fingers crossed that I can actually pull this off!
weld it up for the mot job due to how bad the whole area around the rot
is. if that was just plated up it would be a night mare to get it back
to being a nice car again due to having to weld he floor and body together."
Tuesday, 13 June 2017
Some good fortune
My eye is now back to normal and garage sessions have resumed!
During my recovery period I got lucky on a front passenger side quarter panel. It was listed on eBay, but the title was brief and the description somewhat vague. The listing made no mention of the manufacturer, but my intuition told me that it was likely a genuine VW Mexi panel. After several attempts to establish contact I finally managed to speak with the seller literally minutes before the end of the auction. He couldn't tell me if it was a genuine or not as it had been collecting dust in his garage for years and he couldn't recall much about it. He lived too far for me to collect in person, but was happy for me to arrange my own courier. The price was low with just one other bidder, so I took a punt on it and hoped it was what I suspected it to be. Got the panel for a mere £72 and found a courier who transported it across the country for under £10 (super bargain!). The following week I took delivery of the bulky parcel and eagerly unwrapped the panel:
Got a little tingle when I saw the manufactures label:
It was indeed a genuine VW panel 'Assembled in Mexico'. An excellent result considering that these are rapidly becoming scarce and now command a high price tag from the usual parts vendors (£250 currently).
Delighted that I now have matching Mexi panels for the front end:
Wednesday, 31 May 2017
Patching up the rear stud line
I was planning on writing up this post once I had completely finished the area I've been working on. However, I have been forced out of action for at least a week following an unfortunate incident that could have been easily avoided if I hadn't become complacent and developed some bad workshop habits. Consider the following digression a cautionary tale if you also happen to work with power tools; always wear eye protection even for the quickest and smallest of jobs!
This past Monday was a bank holiday in the UK, but I spent half of it in Bristol Eye Hospital getting a tiny piece of steel removed from my right eye that had embedded itself just off-centre of my pupil. I had assumed over the previous couple of days that I had a touch of conjunctivitis until I developed hyper-sensitivity to light and my iris became unresponsive (it was stuck at its smallest aperture and wouldn't expand regardless of the amount of light in my immediate environment). Turns out that the metal had started to rust and infection was beginning to set in around the foreign body. The method used to remove the metal and eliminate all traces of rust from my eyeball involved a rapidly vibrating needle. The instrument resembled an electric toothbrush with a sewing needle where the brush head should be. It really was as fun as it sounds, here is my poorly eye after the procedure:
Lesson learned, I will now invested in a full-face shield. Right, back to the main topic...
In between other tasks I have been progressively patching up the drivers side rear stud line where the wing attaches. This was in a poor state due to years of moisture getting trapped between the wing beading and the rear quarter panel. The pitting was very heavy in places and on close inspection there were a few pesky pinholes where it had completely rusted through. I decided the best way to make the stud line solid again was to let in good metal and eliminate the pitted areas, rather than simply slapping body filler over it and hoping for the best. I will let the following photos do the talking:
I noticed that on some of the studs warping had occurred if there happened to be pitting in close proximity, thinning the metal and distorting the surrounding area. These will also need to be replaced, but I will tackle them one at a time to preserve accurate alignment along the stud line:
Despite making a suitable patch for the first nut I eventually opted not to weld it in just yet as I wanted to continue repairing the areas between the studs first. So, moving swiftly on:
And on to the next one:
Note that I have not welded up the end sections of each patch. This will allow me to easily remove the studs later by cutting just the tops and bottoms.
Well, that is it for now. More stud line action to come once my irritated eye has healed!
Labels:
fabrication,
grinding,
homemade,
Landmark,
rear quarter,
repair,
rust,
Shell,
welding
Subscribe to:
Posts (Atom)