Wednesday, 6 November 2013

Odds n' sods

I turned my attention back to the chassis again last week and started tackling some of the small but nonetheless important jobs. First up was smoothing out the bad welding that was highly visible on the transmission mount: 


After grinding the welds flat it looked far neater. However, I am now a little concerned about the strength of this joint, but I will keep under review and may come back to it in the future:


Next I focused on the reinforcement braces which sit underneath the outer edges of the floor pan upright sections and attach to the u-shaped brackets which come off the torsion bar housings. My originals were in a sorry looking state and had been butchered and plated over numerous times in the cars history: 


The driver’s side was far worse, with blobs of weld everywhere:
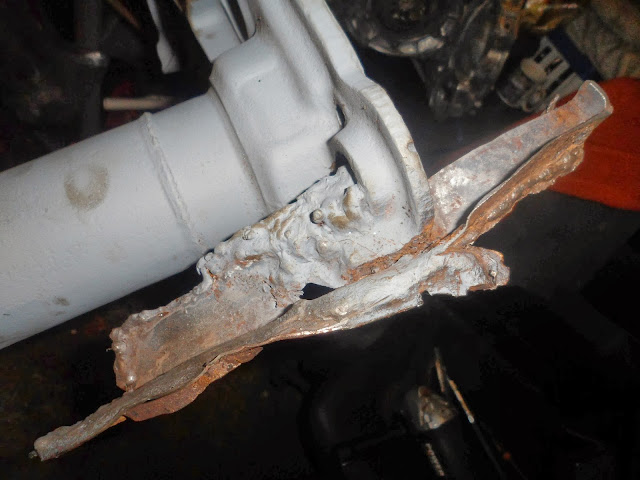

After carefully excavating all of the additional rusty layers with the grinder I found the original metal! 


What I am left with will provide a good basis for fabricating some replacement sections or I may just attempt to repair what is already there. I will ask around and come back to it soon.


Tuesday, 29 October 2013

Transmission clean-up

This week I decided to partially dismantle the transmission, although only as far as removing external components. I wanted to clean the thing up and replace any perished gaskets and renew the CV boots etc. I never had any issues with this gearbox and therefore I was not too keen on fiddling around with the internal mechanisms. As my old man always says: “if it aint broke, don’t fix it!”. Pretty sound advice I reckon! 


I thought this task was going to be fairly straight forward, but I couldn’t have been more wrong! I made a fundamental mistake when I first started taking the car apart by not loosening up the rear drum brake nuts whilst is was all still together. The weight of the car combined with the use of the handbrake would have held the outer drum case firmly in place whilst the substantial torque required to loosen the 36mm nut was applied. It would have been a breeze! What I was dealing with here, however, were a couple of resilient old nuts that would not budge and drum brake casings that were seemingly impossible to fully lock off. I tried a lot of different approaches such as; coating the nuts in penetrating oil. Nothing. 5ft Pipe cheat. Nothing. Heating the hub nut with a blowtorch until it glowed red. Nothing. I then called on the assistance of my garage neigbour and good friend, Tony, in the hope that our combined weight and brawn would break the tight bound. NOTHING! So, after a lot of tea and head-scratching, Tony suggested that a small cutting disc attached to the Dremel could provide the solution.  Basically, this sacrificial approach involved making a careful cut down the edge of the nut(s). I tried to make it as deep as possible whilst avoiding damaging the thread underneath:
 

I then repeatedly impacted the incision with a heavy duty chisel until it cracked open enough to come free:


Success! Obviously I now need to order a couple of replacement hub nuts, but I was just glad to get these old things off:


The other noteworthy challenge that I encountered after removing the drum brake components was how to remove the snug fitting rear wheel bearing. I didn't have a bearing puller, so tried to make my own improvised version based on the instructions in John Muir's book 'How to Keep Your Volkswagen Alive'. I soon got frustrated with that approach and opted for the big hammer technique instead:


After a few confident taps on the back of the outer axle tube the bearing slowly worked its way loose:


I was then able to remove the big inner circlip (that was another fiddly job took a while!) and draw out the axle rod(s):


To begin the clean-up of the casing I scraped away most of the greasy dirt with a large flat-headed screwdriver. Then I moved on to degreasing it with petrol, an old toothbrush and a lot of elbow grease. I then went over the whole thing with an assortment of wire brushes. Here is the before shot: 


....and many hours of scrubbing later, here is my glorious after shot: 


Monday, 7 October 2013

Test fitting the floor pans


Exciting times! The Wolfsburg West floor pans arrived last week, so I couldn’t resist a quick test fit to see how everything lined up;


They cost a pretty penny, but I feel it has been money well spent having inspected the excellent quality of the pressings.

Monday, 30 September 2013

Dismantling the front beam

I decided to dismantle the front beam this past weekend in preparation for cleaning, painting and possibly narrowing: 


First up was the removal of the grease caps, which popped out easily enough with some gentle coxing of a flat-headed screwdriver: 


Once the nuts and washers had been taken off of the greasy spindle the outer casing of the drum brake came away without too much fuss: 


After undoing the three inner bolts the drum brake backing plate came free. Both sides came apart without any drama: 


I then removed both shocks, which were simply secured by bolts at the top and bottom:


Another two bolts later I had the steering damper detached:


The tie rods required a bit more persistence and preparation. I found that wire brushing the nut and exposed thread followed by a liberal drenching of WD40 (penetrating fluid) was the best method:


The above approach worked for all but one tie rod end (why is there always one little stubborn bugger?!). Frustratingly the thread started spinning freely before I had got the nut off. I found that no amount of clamping with the vice grips would hold the thread tightly enough to that damn nut to turn again. After some time and perseverance I decided that I would sacrifice the track rod end as I was considering replacing them all anyway. So, out came the angle grinder:


I then cleaned up the treads of the steering box and removed the unit with ease:


After loosening the clamping bolts I was able to tap out the link pins, which allowed for the removal of the spindles:


After removing the outer nuts and cleaning out the accumulated crap inside the allen key cavities, I loosed the threaded pin which holds the torsion leaves in place:


The torsion arms were then free to be removed:


Just for fun I set up an exploded view of the individual components that make up the front beam:   

Tuesday, 24 September 2013

Deck lid clean-up


This past week I have been stripping the deck lid amongst other odd jobs; such as improving the lighting situation in the garage because the days are getting increasingly shorter! As with the front wing the deck lid had been taken back to bare metal previously and left without any protection (I still don’t know what possessed me to do that!). Surface rust:


Freshly stripped:


....and primed:


As previously noted, it is all in good shape apart from one small area that will require a repair patch. I also want to weld up the three badge holes as I know that these are not original. 

I will also be switching the number plate light from the early ‘popes nose’ type back to one that is correct for the year.

The back of the panel took quite a while to sort out because of all the hard to reach areas:


Thursday, 12 September 2013

Miscellaneous chassis parts

I have been feeling under the weather all this week, so i've not getting much accomplished. Having said that, I have still been popping down the garage and spending a couple of hours each evening on cleaning up some of the chassis parts. Here we have a comparison between an untouched spring plate and one that has just been cleaned and primed:


 and here is the right side stripped using a flap disc and wire wheel:


 A few more parts cleaned:


.....and primed to keep them fresh:


......and hung to dry:

Monday, 9 September 2013

Fixing my old mistakes

I have now ordered a sturdy pair of Wolfsburg West floor pans and a few other miscellaneous chassis parts. Whilst waiting for them to arrive (think the store are waiting on a new shipment from the States) I decided to tidy up a few old errors that I made when I was young, foolish and uninformed. Basically all the parts that I hastily stripped at the beginning of the restoration I had stupidly left as bare metal. I don't know what I was thinking and it doesn't take a genius to know what happens to exposed metal over the years:  


This would be perfect if I was going for a 'rat look' bug, but I am aiming for something a little more refined! So, out came the wire wheel and various sanding devices and after a few hours I had the panel stripped back to fresh metal ....again:


I then applied a liberal coat of primer to prevent the surface rust reappearing:


Now I just need to do the same for the rusty decklid and bonnet *sigh*