When I started this adventure I never thought I would be getting this savage with my beloved VW. If I did have any insight into the extent I would eventually be going to, I think I would have been too overwhelmed to even make a start!
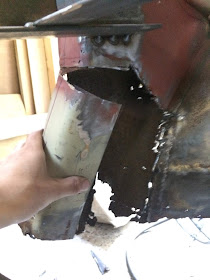
Anyway, let me back up and go over the steps I took to remove the passenger side front quarter panel. Firstly, I removed the bonnet cable guide tube having carefully noted its position and orientation on the quarter panel. It was brazed on in several places and I will hopefully do the same (another skill I will need to learn) when I reattach it back to the new panel. The Dremel tool with mini grinding wheel was great for this delicate job:
With all the brazed welds either ground down or cut through, the guide tube came free without any trouble:
I then need to take care of a dodgy old 'repair' at the bottom of the A-post (nothing to do with me by the way). It was annoyingly seam welded to the inner arch as opposed to spot welded:
The angle grinder made fast work of it. Oh look, it appears to be another crappy old Veng repair panel:
Cut around the top of the panel underneath the point where it meets the scuttle panel:
Had to locate and drill out a bunch of spot welds hiding at the bottom of the spare wheel well. Conveniently, I didn't have to bother with this step before as the same section on the other side had entirely disappeared due to rot:
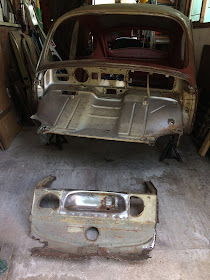
After a lot of patience I had the panel off:
To finish off it was a case of removing the few remaining spot welds to free the inner fuel tank and space wheel well structure, which I wanted to keep together as one assembly:
Having this section free of the car means it will be far easier to clean up and make repairs:
...And so this leaves me with a significantly shortened car, the advantage of which is that I have now liberated a couple of extra feet of precious workshop space, haha.


Nice work! I think I am finally ready to get down to the business of getting mine back on the road. I have posted some photos on abugnamedroscoe.blogspot.com if you want to check it out. Still working on the layout of my blog. I shamelessly stole much of it from yours!
ReplyDeleteHiya, thanks for letting me know about your blog. I shall hop over and check it out now. Go ahead and 'Steal' whatever you need from me (except for my precious NOS panels, haha). I will be following along with interest :-)
DeleteHey it's been a while since you've update the blog. I've just read through it from start to finish and am hanging on waiting for the next episode of this boxset! Don't leave us hanging!
ReplyDeleteThe intermission is almost over.
DeleteMajor update imminent.
All is well.
define imminent :)
ReplyDelete
DeleteHaha, fair comment! I’ll have an update by the end of the year and intend to get back to a regular schedule of work shortly thereafter. 2020 will are some serious progress!
happy 2021!
Delete