A quick update on the previous couple of weeks of sporadic garage work. First up, I chiselled off the bonnet seal retaining strip from the scuttle panel. It had become pretty ratty in places with evidence of rust creeping out from underneath:
Came off pretty easy. Just took my time and avoided putting any unnessarsary stress on the scuttle panel when prying it up:
Next was to cut out this little area that had rusted all the way through:
I could have made my own patch easy enough, but figured that I would instead use the corresponding section from the donor scuttle that I had. Feels good to know that a bit more German steel (albeit a small amount) is getting grafted back into the car:
Welded, ground back and blended to an invisible finish:
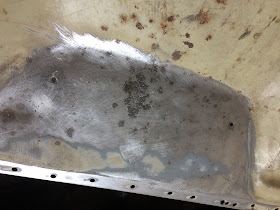
My next mission was to patch up a total of 12 drill holes of various diameters that peppered the front-under-bonnet panel (not sure if this section has a technical name, but you'll get what I mean):
I am guessing that these holes would have been drilled by previous owners in order to mount radio units, car alarm systems etc. Some were small and discreet, while others were significantly larger and punched through the thin steel in such a way that they looked like mini volcanos:
For these unsightly blemishes a gentle bit of hammer & dolly work was required to make the areas flat and smooth out any depressions and denting in the local area:
Filling the holes was a simple case of backing them with copper and progressively filling with the mig welder before grinding back to a smooth finish on both sides. Just a bit of time and patience was all that was needed:
Last ones:
Holes no more:
Pages
▼
Monday, 26 February 2018
Tuesday, 6 February 2018
Windscreen corner and demister transplant
Since I first got the car there was always a distracting scab of bubbling paint creeping out from underneath the windscreen rubber. Inevitably, that bubbling later became exposed rust as the paint flaked away and finally an ever expanding hole! Annoyingly it was always directly in my eye-line when driving the car and was a stark visual reminder that my pride and joy was slowly rotting away before me. Repairing this offending section would be a symbolic victory against the rust fairies and their psychological taunts of the past!
The divers side corner looked bad from the top side:
...and was not much prettier underneath:
It would require more than just the mating flanges replacing. My conclusion was that the entire demister section also needed replacing due to the amount of terminal corrosion that had taken hold. I debating with myself endlessly about the best cut lines before finally marking up the area up with masking tape and setting about the task. I have not seen this particular operation done before in other restorations, so it was a 'character building' step into the unknown for me and a real test of my developing skills:
I used the small Dremmel cutting discs to carefully and accurately cut of the section. An angle grinder would have been too aggressive and I felt it could have easily led to errors. So slowly I proceeded. Thankfully my educated guesswork paid off and I was able to lift out the rotten section, complete with integrated demister pipe, in one piece:
On the donor scuttle panel I rough cut the relevant section out so that I could prep it and later trim it down to an accurate fit:
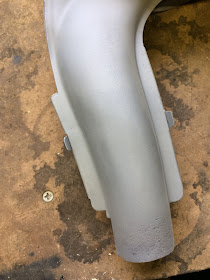
After a session in the shot blast cabinet I had fresh unblemished steel. I was heartened to see just what great condition this section is in:
The only repair I needed to make was a angle grinder gash on the inlet pipe. I guess that the seller who originally chopped out the scuttle from the donor vehicle must have been cutting with haste and this part was a minor casualty. Nothing too serious though:
I filed the protrusions around the cut nice and flat. I then cleaned up a thin piece of copper and added a curve roughly the same as the contour of the pipe. I then inserted the copper backer and clamped it in place with mole grips:
I could then weld up the gap:
After dressing the weld and a quick blow-over in the shot blast cabinet it was looking like new again:
I spent some time carefully trimming up the repair section and repeatedly trial fitted. However, I was starting to feel a little frustrated at this point as I couldn't get the damn thing to line up right on both sides - so I have decided to split the section by drilling out the spot welds:
This allowed me to get a far better alignment on both sides of the dash rather than compromising. Before welding anything permanently into place I took the opportunity to shot blast the soon-to-be inaccessible areas, such as inside the window frame and the top of the door mounting reinforcement panel. Cleaning all this was actually a real pig of a job as it was tough to get the bulky shot blast gun into some of the areas with tricky angles. It was slow going and all I could do was my best, but it is certainly better than just leaving it:
I then added few coats of zinc primer to hopefully prevent any rust re-emerging:
Starting with the inside section I got the best alignment I could paying particular attention to the contours of the dash.
I really took my time with the welding and started at the outlet end which I determined to be the end that was most critical to get right;
As I moved along the tapering flange section I was able to manipulate the steel slightly and adjust the fit. The occasional vertical slit was added as required to allow the shape to be altered more easily:
All welded and smoothed out and holes filled:
On to the front panel section and I once again started welding at the outlet / corner area before moving towards the centre to complete the weld:
Once the front was welded and smoothed I was just a case of closing the gap between the two sections and plug welding them together. I'm satisfied with the end result as there is virtually no indication of any work having been done;
Couldn't resist a before and after comparison;


