Pages

Saturday, 30 September 2017

Modifying the new cross members

As I mentioned in the last post, I now have some new 'German' cross members which I am going to be using as a foundation to produce some year correct ones (i.e: '64 - '66 Beetle). They will not be 100% accurate, but will come pretty damn close. I have given this a lot of thought and it seems like the best approach as mid-sixties cross members simply don't exist as a repro item. Cross members commonly rust out on a vast majority of old bugs, so getting hold of a rot-fee OG section is almost impossible and only exist on rare foreign cars that have been driven exclusively in dry climates. Anyway, I have not seen this particular modification done before, so hopefully this detailed overview will be of some help to others who may be interested in doing the same... 

I began by drilling out the spot welds and separating the reinforcement section from the main panel. This gave me better access and allowed for a neater job:


On the main panel I smoothed out the unnecessary hump by simply cutting around it and welding in flat sheet steel:


These repros include an access hole to the heater channel. This was not something that mid-sixties cross members had, so I welded it up:


The rear edge needed a new profile adding to accommodate the correct upward angle of the heater pipe. After careful measuring and scribbling a few notes I mocked up a cardboard version of the hump I was trying to recreate:


I then transferred the measurements to sheet steel and cut out the geometric net:


After some folding on the vice and a quick zap of the MIG welder to close up the slits:


Linished back and compared to the original:


tacked into place on the cross member once the appropriate recess was measured and cut out:


After being fully welded, tweaked and dressed:


Just after the hump is a small section that is bent down on the original. I had to improvise around this section as access for clamping was tight. After some careful tapping with the hammer (remember that man light taps are better than fewer hard bashes), I got the 90 degree bend I was after:


Next task was to alter the heater pipe hole to the correct oval shape:


And trim the return flange to match the original (which terminates about halfway down):


At this point I roughly bolted up the heater channels to the pan and added the crossmembers. The fit wasn't as good as I had hoped and I was unsure at this stage if this was due to the restored pan being off or it the location of the mounting holes in the new panel were incorrect. After some head-scratching I discovered that the lower holes were not spaced apart close enough. There was a 5mm difference compared to the OG spacing. 

To correct this I elongated the hole;


Then using a copper backer I welded the other end to close up the gap slightly:


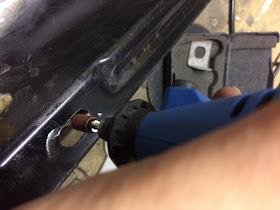
After some Dremel tool action I had it all looking correct again:


I then shot blast the entire panel before plug welded the mounting reinforcement sections back into place:


Moving on to the thicker supporting rear panel that I removed in the first step, I proceeded to cut out the unnecessary hump and chopped off the rear section that I assume adds strength to the underside of the boot corners. However, this was not present on the originals so I determined that it was surplus to requirements:


Welded in some flat sheet to replace that bump and welded up the access hole that was also present on the main section:


I welded up this little join to add a bit more rigidity:


Shaped the mating flange that will eventually fix to the inner side of the rear wheel arch:

Shot blast the reinforcement panel and got it realigned the best I could to the main section. I decided not to plug weld the pieces together at this point, just in case I needed to adjust anything further down the road. So, here is the nearly finished article just prior to spraying with zinc primer:


Now to do the same on the other side...

Friday, 8 September 2017

Rethinking the rear crossmembers

Although I had previously acquired a pair of genuine VW rear crossmembers I have since decided to take another route. Those Mexi ones could be made to work but have a different overall profile to the mid-sixties ones and are more square/angular looking. They also lack the mounting stud that locates the bottom hole of the rear wing as they are designed for later cars. One other annoyance is that they don't fit up to the Klassic Fab heater channels without trimming down the mating flange (located at the and of the channel) considerably. Those channels were expensive because they are high quality and accurate; I really don't fancy chopping them about!

Fortuitously a new reproduction crossmember has recently appeared on the market from out of nowhere and is supposedly 'German' quality (always a bit sceptical about that term) and made from factory gauge steel. I have seen them being used in a couple of other restorations, but have been unable to find out a lot of information about them. So, I contacted VW Heritage (one of the only UK stockists) to see if they had more about the manufacturer and swiftly received the following reply; "We don't have the manufacturers name, but we source them from a German supplier". Oh well, despite being no clearer about their origins I took the plunge and ordered a pair. I knew that they would still need modifying as they are made for cars up to '63, but in general they are a lot closer to mid-sixties OG ones and therefore a more logical basis to start from. I was quite impressed when they arrived, thick steel and super crisp pressings. Here is how they visually compare against the genuine Mexi (grey) ones, you can clearly see how much they differ:


I salvaged a few things from my old crossmembers that will be transferred over to the new ones. Firstly, I needed to remove the heater pipe. I shot blast the area so that I could reveal where the factory welds were:


I then carefully worked my way around the pipe (on the front and backside) with the Dremel tool equipped with a small cutting disc until it came free:


Next task was to separate these little reinforcement pieces from the top of the bolt holes using the spot weld cutter:


After a quick clean up they are ready to be reused:


Utilising the remains of the old crossmembers as reference I am able to study what I need to do in order to make the new panels close to OG and devise a plan of action. In the next post I will go into detail about how to adapt the new cross members to make them correct for a '64 - '66 Beetle...